Making Your Own Winamp Skin: Where the Classic .wsz Format Came From
Winamp skins look complicated when you see a finished one: tiny glowing buttons, a pixel-perfect display and a window shaped like a stereo from another planet. Yet underneath, a classic skin is a very simple thing. It is a folder of small pictures, packed into a single file. That simplicity is why thousands of fans could make skins in the late 1990s, and why the format still works today. This article explains how the .wsz format came about, what is inside a skin, and how you can make one.
If you want the broader history of skins and where to find them, see our earlier article on Winamp skins and how to use them in JahSing 3. This one is for people who want to make something.
How the format came about
Winamp’s first release came in April 1997. Skins arrived with Winamp 2.0, released on September 8, 1998. Winamp published documentation on how to make skins at that time and invited users to share them. By the year 2000, there were nearly 3,000 skins available. The skins had to be easy to make, because the audience was not programmers but ordinary fans with a paint program.
The answer was to build a skin out of ordinary bitmap pictures (.bmp files) and a few text files, and to bundle them in a standard zip archive. Zip files were already familiar and were easy to create on any computer. To tell skin files apart, they were given the ending .wsz, which is a zip file with a different name. The .WSZ file type is described as a zip archive holding a collection of bitmap and cursor images and text files, and many contain around 45 files in total.
What is inside a skin
Each picture in a skin has a fixed name, and the player knows which part of its window each one belongs to. As an example, here are the files inside the skin that comes bundled with JahSing 3’s classic skin mode:
- main.bmp: the background of the main player window.
- cbuttons.bmp: the five transport buttons (previous, play, pause, stop, next) and the eject button, each with a normal and a pressed picture.
- titlebar.bmp: the strip across the top, and the little window buttons.
- shufrep.bmp: the shuffle and repeat buttons, plus the EQ and playlist toggles.
- monoster.bmp: the indicator that shows whether the song is mono or stereo.
- numbers.bmp: the digits for the time display, from 0 to 9.
- text.bmp: the small letters used for the scrolling song title.
- playpaus.bmp: the tiny play and pause indicator.
- posbar.bmp: the seek bar and its slider knob.
- volume.bmp and balance.bmp: the two sliders.
- eqmain.bmp: the whole equalizer window, with its sliders.
- pledit.bmp: the frame of the playlist window.
- pledit.txt: a short text file with the playlist colors.
- viscolor.txt: the colors for the audio visualizer.
Other skins may add more, such as extra pictures for the equalizer or generic windows, and sometimes cursor files. Not every skin includes every file. A good player fills in any gaps with defaults.
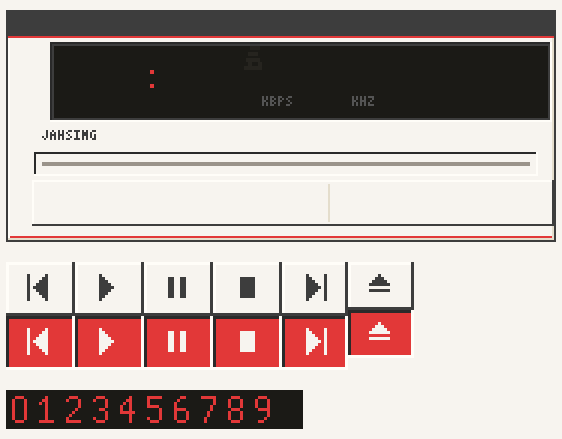
Notice how each picture is a “sprite sheet.” The buttons are all in one picture, laid out in a grid. The player cuts out each little square and puts it where it belongs. JahSing 3’s project notes describe exactly this: it unzips the .wsz, slices the pictures into sprites, and draws the windows with them. The classic mode includes the main window, a compact “windowshade” version, the equalizer and the playlist window, and six different ways to animate the scrolling title.
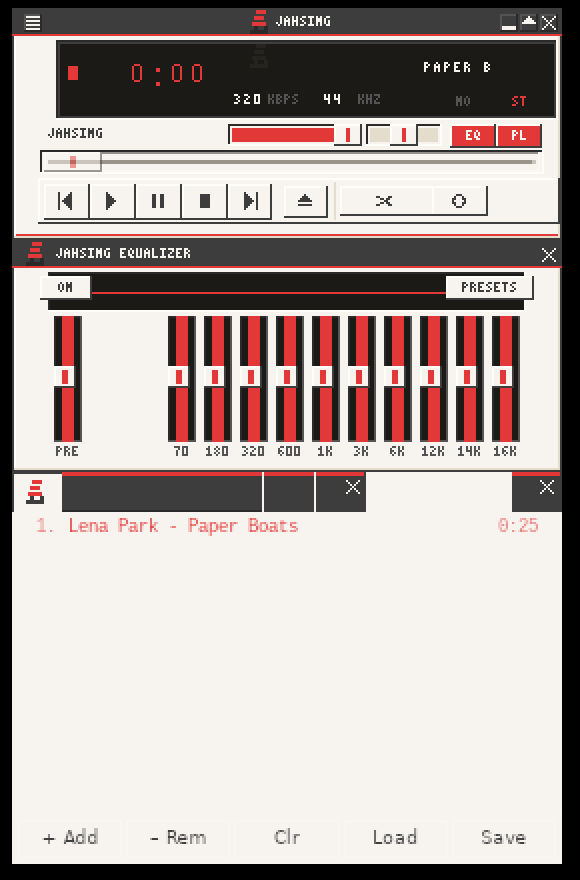
Making your own: the easy way to start
You do not need to start from nothing. The best way to learn is to take an existing skin you are allowed to modify and change one thing at a time. Here is a safe path.
1. Get a skin you may modify
Many skins on archive sites are shared by their authors for people to enjoy, but that does not always mean they can be changed and redistributed. Check the author’s notes or the site’s rules. For learning, make a private copy and keep your changes to yourself. Better still, start from a skin that is clearly open for modification.
2. Make a working copy
Copy the .wsz file and change the ending of the copy from .wsz to .zip. A computer will now open it as an ordinary zip archive.
3. Extract it into a folder
Unzip the files into a new folder. You will see the picture files listed above.
4. Edit one picture
Open a picture in an image editor that handles bitmaps. Keep these rules in mind:
- Never change a picture’s size. The player cuts sprites at exact positions, so the width and height must stay the same.
- Save as .bmp with the same file name, and avoid fancy options. Plain 24-bit or 8-bit bitmaps are the safest.
- No smoothing. Classic skins are pixel art. Turn off anti-aliasing when you draw so that edges stay crisp.
- Change little, test often. Try something simple first, such as the color of the buttons in cbuttons.bmp or the digits in numbers.bmp.
5. Pack it up
Select all the files (not the folder that holds them) and add them to a new zip file. This matters: the pictures must be at the top level of the archive, not inside a subfolder. Then rename the zip so that it ends in .wsz.
6. Try it in JahSing 3
- Open Settings and find the Classic skin card.
- Choose a skin file with the Choose skin… button and pick your .wsz.
- Switch to skin mode with the keyboard shortcut Ctrl + Shift + S (Command + Shift + S on a Mac), or with the button on the same card.
The Settings card says that you can load any .wsz, and that the bundled JahSing 3 skin is used otherwise. If your edit does not show, check that the file names and sizes match the originals. A right-click on the skin’s main window opens a menu with an option to choose a skin and one to exit skin mode.
Colors and the text files
Not everything is a picture. The small text files matter too.
- pledit.txt sets the colors for the playlist window: the normal text, the currently playing line, the background and the selected-row background. The one in JahSing 3’s bundled skin is a few lines long and uses the project’s own palette.
- viscolor.txt lists the colors for the visualizer bars, one per line.
You can open these in any text editor. Colors are written as hex codes, such as the red #E23838.
Design tips
- Keep it legible. The most beautiful skins in the world are useless if you cannot read the time. Make sure digits and text have good contrast with their background.
- Keep the buttons recognisable. People expect the play button to look like a triangle.
- Design for small sizes. The classic window is only 275 by 116 pixels. Every pixel counts.
- Test at double size. The classic mode has a “Double size” option in its menu. Check that your skin looks good enlarged.
- Be consistent. Use a small palette of colors across all the pictures.
Sharing your skin
If you make something you are proud of, the classic skin community is welcoming. The Winamp Skin Museum is a searchable collection of classic skins. Before sharing, make sure everything in your skin is your own work or properly credited, include a short text file with your name and any notes, and keep the file small. Remember that logos, characters and artwork from other people may be protected.
Why does the format last?
Because it is easy to understand, and nothing in it depends on a particular program. Pictures, colors and a zip file will still be readable decades from now. That is why players built today, in a different language and for different systems, can still wear a skin made in 1999.
In short
A .wsz skin is a zip file of named bitmap pictures plus a couple of text files. To make one, copy a skin you are allowed to change, edit a picture without changing its size, zip the files and rename the result. Then load it in JahSing 3’s classic skin mode. You can download JahSing 3 from the Downloads page.
Sources: Winamp (Wikipedia); .WSZ file extension (FileInfo); Winamp Skin Museum; JahSing 3 migration notes and the bundled skin’s file list. We did not test loading a hand-edited skin for this article, so please report anything that behaves differently.